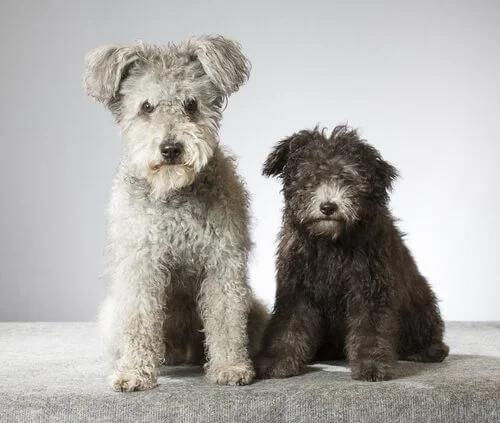
If you’re one of those “do it yourself” guys, here’s a summary of how to groom a Pumi in the comfort of your home.
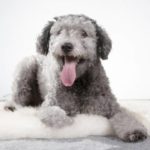
The Goal: The Pumi’s coat is rustic. It should cover the body with well-defined curls and springy ringlets. The coat looks rough and unkempt. Rake coat out prior to bathing. Air dry only.
- Correct grooming procedure: Rustic Hand-Scissored
- Common pet grooming practices: Rustic Hand-Scissored/Clipper-Trim
- For pets: use a #5F, #4F or medium to longer guard combs to set the pattern on the bulk of the body.
- Ears: are semi-pricked with tassels at the tips.
- No defined stop.
- Head: is a blunt wedge shape.
- Throat: is trimmed closer than body.
- Coat: Rake through to remove blown coat prior to bathing. Do not back-brush.
- Legs: fall in parallel lines from the shoulder. Use the shoulder muscle to set pattern line.
- Feet: are rounded and face straight forward.
- Tail: trim it long enough so the coat does not part when carried over the back. Base of tail is trimmed a little closer creating a keyhole when the tail is raised.
- Use the thigh muscle to set pattern line.
- Lowest point of pattern should be at the bend.
- Hocks are parallel.
- Pads are trimmed close.
Either hand-scissor the entire coat or clipper-trim to set the basic pattern. Pet dogs can be modified into shorter trim styles using the same basic pattern. Blenders and thinners work great on this coat type.
Bathing and Drying the Coat
Coat and Skin Characteristics
- The finished look of this coat type is rustic, tousled, and unkempt looking.
- With most rustic coated breeds, the first year, as the coat goes from puppy to adult, it can be a challenge to keep the coat from matting.
- Weekly combing and raking are primary tools for maintaining a rustic coat. Encourage owners to comb and rake their dogs using a wide tooth comb and/or rake. They can also monitor the coat by spreading their fingers apart and sink them all the way to the skin as they pet their dog keeping the curls and ringlets separated.
- Always use a wide-toothed comb or rake on their coats. Comb or rake them out prior to the bath or while they are still wet.
- To maintain the natural look, rustic coated dogs should never be brushed or blown dry. Towel and air dry only.
- Let them air dry or use a dryer on a very LOW temperature and speed setting so as not to straighten the hair shaft. You want to encourage the coat to curl, thus achieving the natural, or rustic look.
Frequency
Bathe every 3 to 12 weeks or when needed. Rake through the coat every 2-3 weeks with or without a bath, to keep matting under control. Lighter colored dogs with ringlets may need more frequent combing and raking as their coats tends to mat more easily than darker colored dogs.
Pre-Work
Rake out the coat prior to bathing to keep the coat from becoming a solid pelted mass. This will remove
the undercoat “lint,” preventing matting in the future. Trim or grind nails at least every four to six weeks
to maintain a healthy foot structure.
Clean the ears every four to six weeks, by swabbing with a mild ear cleaning solution. Hair should be plucked from within the ear canal only as necessary for healthy ear management.
Rustic coated breeds are never blown or fluffed dried. They are always naturally air dried to maintain the curly, unkempt and tousled looking coat.
Bathing
Bathe the dog with a very mild shampoo. With coats over 3 inches, squeeze the shampoo solution through the coat, never rub or scrub. Rinse while squeezing the water through the coat if it is longer.
Do not stop until the water runs clear. On dogs with ringlets, a conditioner may be applied to aid in making
future, weekly comb-outs easier.
Drying

Wrap the dog in towels and blot dry. Apply gentle pressure. Get the coat as dry as possible using this method. Air dry in a kennel enclosure where it is comfortable and safe for the dog.
Use box fans to keep air circulating around the dog. Total drying time with a rustic coat can take quite a bit of time.
How long depends on how much moisture is present in the coat, the air flow around the dog and the humidity in the drying area.
Maintaining the curl or tousled look to the coat is important for the correct “look” for the rustic breeds.
An inactive drying method is the best choice. Let them totally air dry naturally or place them where gentle
airflow will circulate around the dog.
Care must be taken to maintain a LOW heat setting in the circulating air, or the dog will be at risk for
heat stroke. For the same reason, it is important to have water available for the dog and monitor their drying progress carefully.
Grooming the Body
General Pattern Lines
The breed standard calls for the wavy and curly coat to be between 1,5 to 3 inches long all over. The actual coat length may vary slightly to accentuate or lessen key conformation points of the dog.
There are no broken lines anywhere, and the coat outlines the natural contour of the body.
The body can be either hand-scissored or clipper-cut with a longer guard comb. Start at the withers and work back over the body towards the tail.
Use caution if working with guard combs as they can get stuck in the coat. Leave coat about 1 to 1,5 inched long over the entire body. Follow the contour of the body. Do not back brush. The goal is a dog whose coat is somewhat rough and messy looking.
If the coat needs to be fluffed, fluff with a coarse or wide- toothed comb. Many pet owners opt for less than 1 inch of coat for easier home maintenance trim styling.
Undercarriage
The highest point of the tuck up falls just below the last rib. From that point forward, the undercarriage angles slightly down towards the elbow. The undercarriage line should not fall below the elbow between the front legs.
Tail
The bulk of the tail is trimmed with scissors or thinning shears to between3 and 5 inches in length, from just behind the ring to the tip of the tail. When the dog carries its tail over the back, if the coat parts at the center, it’s too long.
Shorten the length of the tail coat to a point where it does not part when it’s in its natural position. The
base of the tail is trimmed shorter with thinners, creating a full ring. To place the ring, hold the tail down over the rectum.
The area that is shorter is from the base to halfway between the point where the back legs converge. Trim
the ring around the base of the tail the same general length as the body. When finished and the dog holds its tail over its back, you want to see a “keyhole” of light just ahead of the base of the tail.
Feet
Both the front and rear feet are compact with well-arched toes. To show off these traits, the feet are trimmed very close to the edge of the foot, beveling out into the fuller leg coat.
The feet should point straight ahead, toeing neither in nor out. Begin by gently picking up the leg and with a wide-toothed comb, comb the coat over the foot. Slide your hand down the leg to the foot.
Scissor off the coat that hangs below the level of the foot pad with shears. Work around the outer perimeter of the foot with detailing shears to minimize the risk of injury—never cross over the foot pad with scissors.
Set the foot on the table and neaten the foot with shears or blending shears beveled out into the longer coat on the leg. An alternative for quickly rounding the feet is to do it when the pads are trimmed.
If a very close cutting blade is used to trim the pads, use a wide tooth comb to pull the longer hair over the outer edges of the pad and trim that hair at the same time the pads are clipped clean.
Front Legs
The longest coat on the legs can range from 1 to 3 inches depending on the amount of bone and coat density. The front legs drop straight down from the body. When viewed in profile, the front legs fall directly below the withers.
The pattern line at the shoulder is about 2 fingers above the top of the elbow, at the point where the muscle begins to turn under. The coat at the transition line will be shorter, tapering into the longer leg furnishings.
Fluff the leg lightly with a wide-toothed comb before starting the trimming process in this area. This can be accomplished by feathering off at the blending point with the same blade used on the body if the trim is very, short.
To effectively feather off in this manner, you need a steady hand and a dog that stands still. Most stylists prefer to leave the legs to shape by hand with thinning shears or large blenders.
Other methods of blending off at the top of the leg include using a medium to longer attachment comb, followed by blending with shears.
After the final trim, the legs should form two parallel columns descending from the shoulder into tight, round feet. The coat at the back of the elbow is very short and falls straight down off the back of the leg toward the ground, angling in slightly at the pasterns.
Hindquarters
The hindquarters are wide with muscular thighs. If trimming over this area with clippers, clip over the thigh muscle with the same blade used on the body when working with medium to longer guard comb.
For pet trims using shorter guard combs or blades, blend the transitional areas with a slightly longer guard comb. Start to feather off where the muscle starts to turn under on a diagonal line from the flank region to about three or four fingers above the hock.
The blending should be invisible when the trim is finished. Fluff the coat with a wide tooth comb, retaining the rustic look and maintain the curls to the coat. Blend with shears or thinners if necessary.
The stifle area should have enough furnishing left to give the legs substance and angulation. The longest coat on the legs can be up to 3 inches depending on the amount of bone and coat density. Shape this area by hand with shears after the clipper work is complete.
When viewed from the rear, the legs should form two parallel lines to the ground. The hocks are well let down and perpendicular to the ground. There should be adequate coat on the hock area to accentuate the angles of the rear assembly.
Head
The h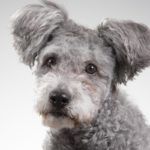 ead is a blunt wedge shaped with high set semi-pricked ears, and deep set eyes that give the dog a “whimsical” expression. Start by trimming off longer hair hanging over the end of the muzzle.
To set the first line of the wedge, use a long set of straight scissors or a large pair of blending shears. Block in the angles of the wedge with shears from the nose straight back towards the top of the skull and the occiput.
Trim a level, straight line. Clear a flat plane over the top of the skull. Next, set in the cheeks. Set the length from 0,5 to 1 inch in length. Once the length is established, then set the line from the muzzle to the cheek using the cheeks as a reference point.
Make the line long and straight. The coat on the lower jaw will be between 3/4 of an inch to 1 inch in length. Scissor a straight line from the chin to the throat back using a longer shear. Be careful approaching this junction to ensure you do not accidentally cut the dog.
Once the wedge shape is established, then go back and round out the edges while lightly fluffing with a wide-toothed comb to check the work.
Eyes
The eyes are deep set. Use fine thinners to remove some of the length, exposing the eye slightly. Leave the coat in the stop area.
Ears
The ears, are semi-pricked and set high on the head. To show this off, trim around the base of the ear with shears closely but not exposing skin. Work all the way around the ear. The ear leather itself is trimmed like a scissored tasseled ear.
The upper part of the ear leather is scissored close to the leather while leaving a longer tassel on the tip of the ear leather. To encourage a pricked ear-set, clear most the underside of the ear leather of longer hair that may weigh it down. Edge both the leather and the longer tassel lightly.
Neck
The back of the neck starts from the occiput to the withers area. Leave this area to the last to trim, pulling together the head, neck and body. Fluff softly with a wide tooth comb.
Scissor off long sections between the top of the head and the body. Blend the sides of the neck down to show off a moderate length, well-muscled neck with a light arch.
Detail Finish
Lightly re-fluff all your work, checking for stray hairs. The coat should not look polished and smooth. The goal is a dog that is mat and tangle-free that looks reasonably tidy but unkempt and messy at the same time. Application of mild cologne and bows is optional.
Suggested Tools & Equipment
- Nail Trimmers
- Styptic Powder
- Ear Powder
- Cleaning Solution
- Cotton Balls
- Hemostat
- Clippers
- Undercoat Rake
- Greyhound Comb
- Wide-Toothed Comb
- Straight Shears
- Curved Shears
- Small Detailing Shears
- Thinning Shears
- Dematting Tools
Common Blade Options:
- #40, #15, #10
- #7F, #5F, #4F
- Medium to Long Guard Combs